Tag Archives: house

adventures with a hundred year old house and light fixtures.

adventures with a hundred year old house and light fixtures. I.

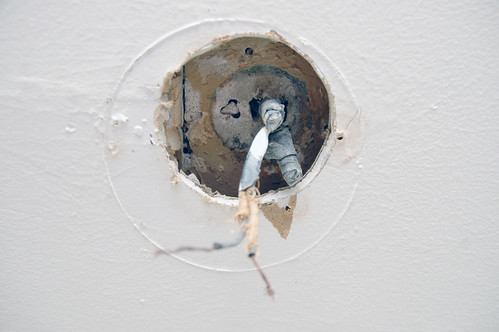
ah, the fun of owning a hundred year old home. the light in our kitchen started look like it was ready to drop down from the ceiling as the screws keeping in place were coming loose.

based on past experience, i had a hunch the screws were simply screwed in the ceiling with no junction box.

turns out, i was right!

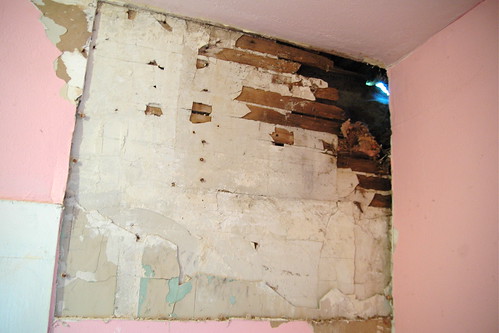
looks like i get to spend the afternoon tearing into the ceiling! the extra “fun” part about old houses is you never really know what you’ll find when you start digging around.

adventures with a hundred year old house and light fixtures. II.

the easiest thing to do would be to put in a special retrofit kit that has a box attached to a bar that extends so it can be secured to the joists in the ceiling. that plan was foiled when i opened up a hole and discovered the ceiling is actually drywall hung on 1″x2″ runners that are secured to the original plaster ceiling. the standard kit won’t work because it doesn’t assume you have 5 inches of plaster and lathe and drywall sitting between the joists and opening. fun times.

now i have to go “all in” and rip out the old plaster and lathe and whatever they are attached to get enough clearance to put in a junction box.

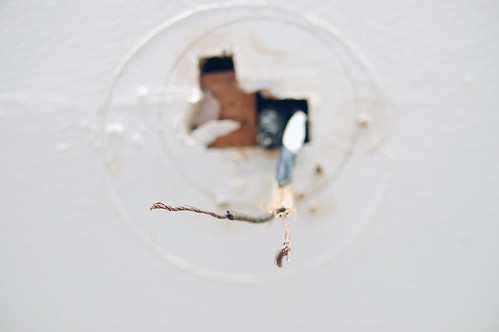
the only question is, which way to the wires run up in the ceiling? if i make the wrong decision when i start removing wood with the jigsaw i’ll sever the wiring.

i’m feeling lucky. i guess.

adventures with a hundred year old house and light fixtures. III.

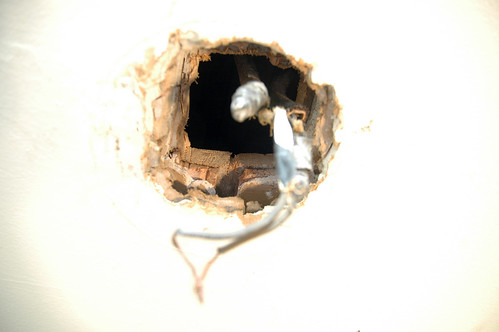
i’m lucky. i guessed good and didn’t nick any wiring.

adventures with a hundred year old house and light fixtures. IV.

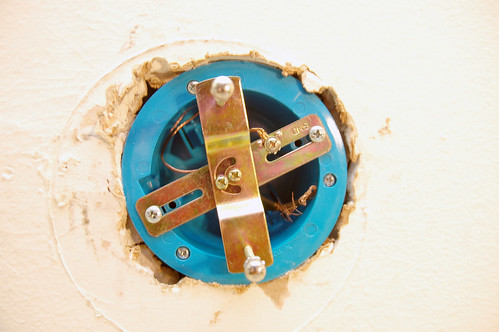
since there’s no room for the retrofit kit that’s secured to the joists i have to go with the second best option of using a box that has little wings which swing out and secure the box to the drywall. i won’t be hanging a ceiling fan off this box but it’ll be good enough for most light weight fixtures.

adventures with a hundred year old house and light fixtures. V.

five hours and an epic number of trips to the hardware store later – mission accomplished!

there’s probably a half dozen fixtures around the house that will need similar work and i’m sure each will be unique in their own little ways.

The Compleat De-Pinkification.

The Compleat De-Pinkification. I.

YOU GUYS, IT’S NOT PINK AND IT’S DONE!

now, if only someone would buy and fix up the dilapidated victorian next door that you can see through the window which is in foreclosure.

yes, the windows still need some work. BUT STILL!

The Compleat De-Pinkification. II.

look at that – NO HOLE!

and i think you have to look pretty darned close to detect the patch.

so, so, so happy to be done with the this project.

day 2608: the family that paints together…

day 2608: the family that paints together... I.

The Great De-Pinkification, continues

we actually have a pretty good system worked out that saves my back from too much abuse. kris cuts in the trim on the floor, i cut in the ceiling and high parts she can’t reach, odin rolls in the bottom half and i do the top.

day 2608: the family that paints together... II.

now that we all have our specialized “finisher” roles – maybe we should start a painting company, “three snowdeals and a ladder”.

so long, prettiest in pink mud room.

so long, prettiest in pink mud room.

soon, finally, the prettiest in pink mudroom will be no more! i would have never guessed we’d live for five years with another home owners color preference.

i made short work of the hole in the corner with some spray foam, drywall and lots of joint compound (i think sprayfoam might be the duct tape of aging home repair ). inelegant, but it’ll last until we get around to doing it right.

also, much replastering of corners and cracks and whatnot.

whenever i do plaster work ( and i’ve done a loooooooot of it ), i always wonder what happens to the plaster particles that end up in my lungs. probably totally safe, right?

now, what color to go with…

need to get by with a little help from my DIY friends.

need to get by with a little help from my DIY friends.

so, i started what i thought was a little repair in the “mud room” and, as i’ve become accustomed to with a 100 year old house, it has turned into a much larger repair!

the drywall tape was starting to come apart in the corner of room and once i got up there i realized the whole corner could move quite a bit! once i started tearing it apart i realized someone had just put up flim flamy piece of plywood nailed to what was left of the decaying plaster and lath, covered it with a section of drywall and taped it all in.

i guess it was relatively secure until the tape started giving way over the years, which is to be expected since the mud room is attached to the main house, but “floats” on the ground. with the seasonal freezing and thawing cycle the whole room can shift and settle quite a bit ( insert rant about attaching “floating” additions in northern climes ).

the “daylight” is the easy fix with a judicious application of spray foam and eventually a little stucco work on the outside.

i can see why they did what they did since there doesn’t seem to be a corner “stud” to properly anchor a section of cement board under the drywall.

any home improvement DIY gurus have any suggestions?

and, yes, the room is pink. even though it’s the prettiest mudroom in town ( and is on the list to be painted after we finish the repairs ).

how do you remove a critter from an inaccessible section of a roof?


kris heard something shuffling around the ceiling of our “mud room” and, sure enough, upon further investigation of the back of the house it appears that a critter has destroyed a section of weather damaged wooden soffit and made made a home in the airspace of the flat roof above the room which, inconveniently, is inaccessible by any normal means.

i vaguely recall squirrels don’t like the smell of ammonia so i thought i’d try soaking some old socks in the nasty smelling stuff even though a googling seems inconclusive regarding it’s effect as an a deterrent. and i guess even if i put some sopping socks up in the hole, i’ll have a hard time knowing if any and all critters have vacated before patching up the holes.

so, how do i force the critter(s) out ( assuming the ammonia doesn’t work ) and guarantee they’re all gone before patching up the hold?


after removing the soffit i could clearly see that critter had chewed through the structural support leading to the airspace between the ceiling and the roof ( as you can see, there’s also some wiring from what was presumably an above-ground electrical line running from the house to the garage ). curiously, it doesn’t look like a new hole. regardless, it looks big enough for a squirrel but not large enough for a raccoon or an opossum.

assuming it’s not a large-ish animal that could do a lot of damage trying to get out, i suppose i could just cover up the hole and let it die slowly and inhumanely. but that doesn’t seem right.

what to do?